
How to assemble the WiMo X-Quad Antenna for 2m
Estimated reading time: 7 minutes
If you want to receive signals from the ISS a simple rubber duck antenna is all you need. However, after a while you might start to lust for a bit more antenna gain. Consequently I’ve purchased a WiMo X-Quad Antenna for 2m. This antenna claims a antenna gain of 10,5 dbD. Furthermore it provides both horizontal and vertical polarisation. Using a phasing harness you can even achieve circular polarisation. This article describes how to perform a WiMo X-Quad 2m assembly. Once assembled, this anntenna can be used to receive and decode signals from the ISS.
Table of Contents
Preparing and checking all components …
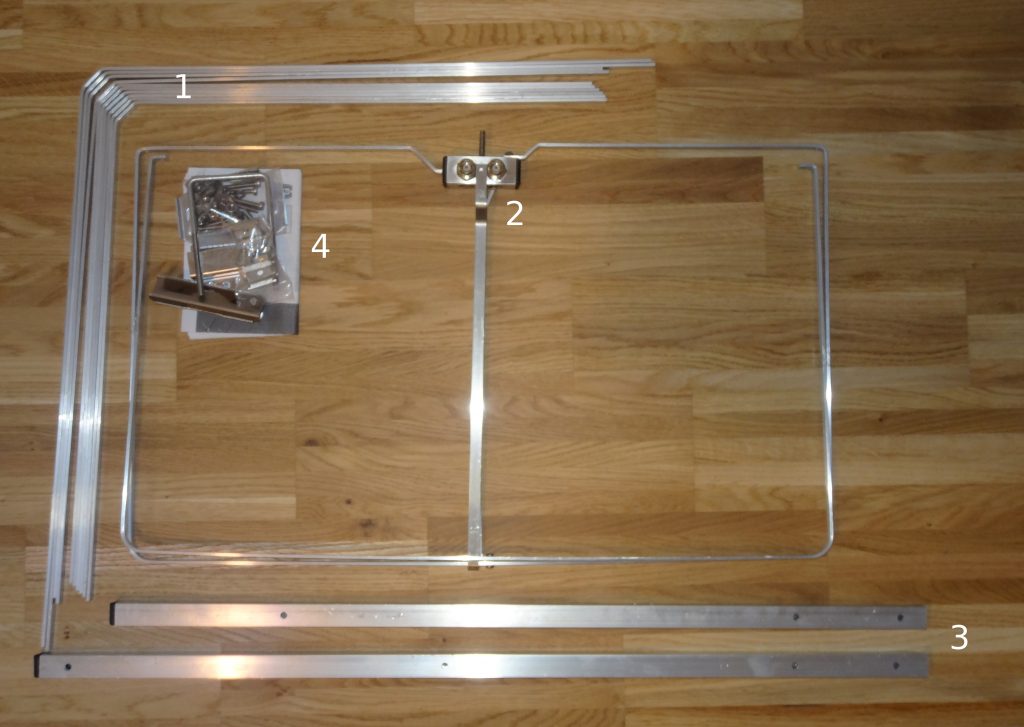
We start by laying out all the delivered parts on the floor. There are 8 director and 2 reflector elements (1). Furthermore you’ll get a disassembled quad-element radiator (2) with 2 female N-connectors. The antenna boom (3) is delivered in two separate parts which need to be joined together. A plastic bag (4) contains brackets, nuts, screws, washers, and other small parts.
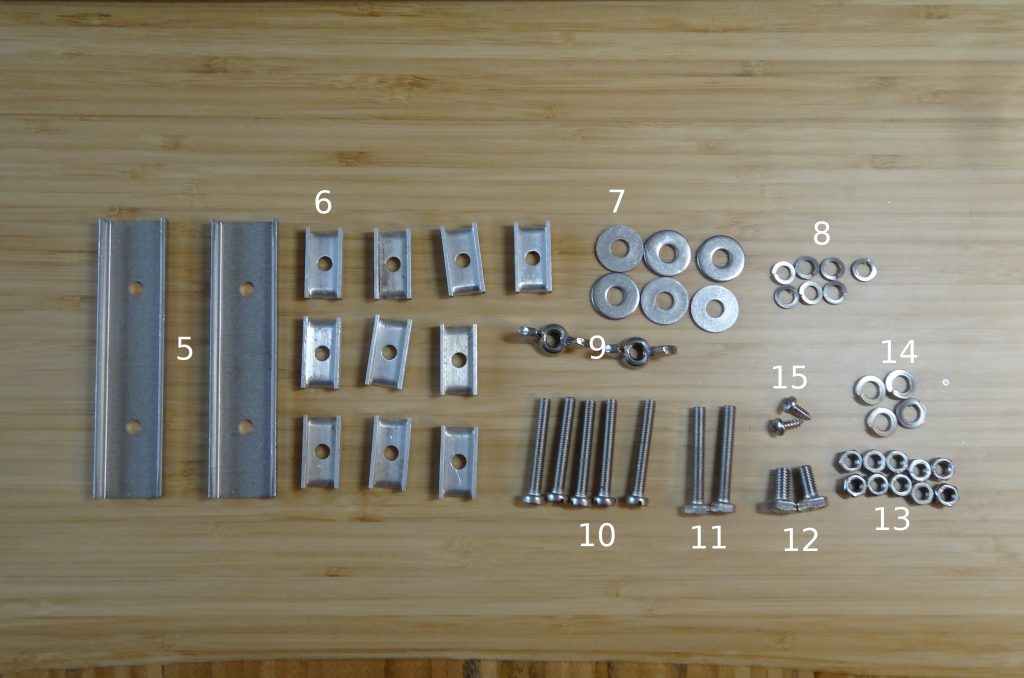
The next picture shows the content of the small parts plastic bag (4): The long U-shaped elements (5) are used for joining the two antenna booms together. There are anti-twist devices (6), M5 washers (7), lock washer M5 (8) and M6 (15), wing nuts (9), 5 x M5x35 screws (10), 2 x M6x35 screws (11), 2 x M6x12 (12), M5 and M6 nuts (13) as well as 2 x self-tapping screws (15).
Assembly of the WiMo X-Quad Antenna Boom
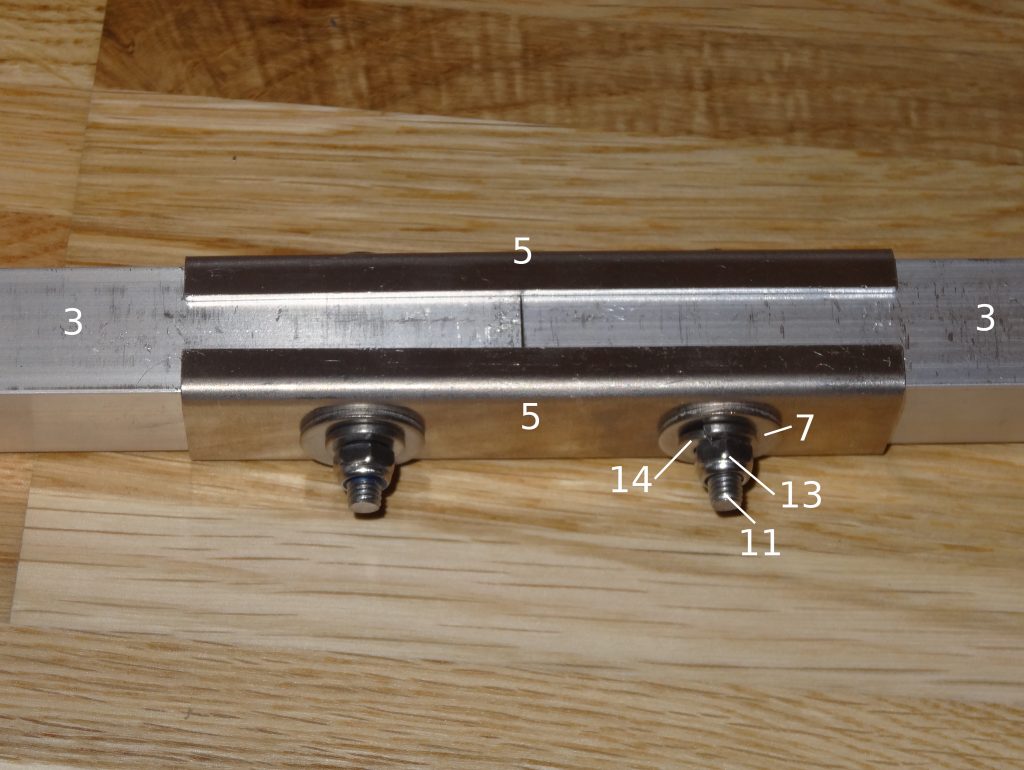
Let’s start by joining the two separate antenna booms (3) using the U-shaped elements (5). This is done by inserting the two M6x35 screws (11) into the pre-drilled holes that exist both in the mounting brackets (5) and the boom parts (3). At the other end you need to mount a washer (7) followed by a large lock washer (14) and finally a M6 locking nut (11). A hex nut set comes in handy for tightening the screws.
Assembly of the WiMo X-Quad Antenna
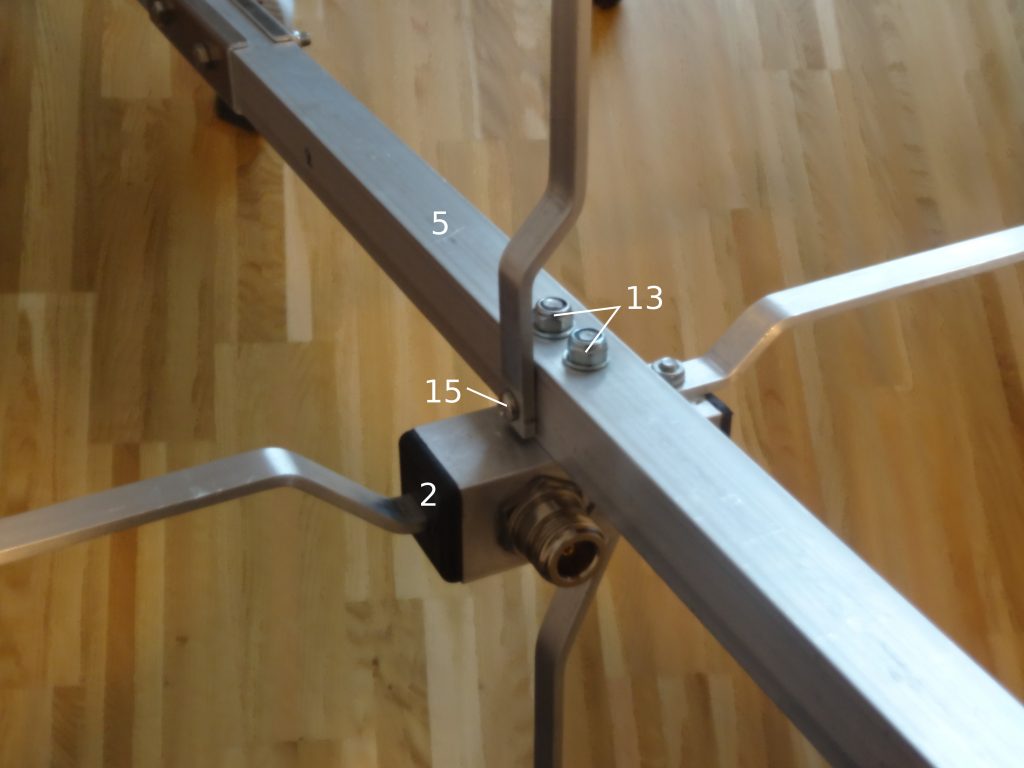
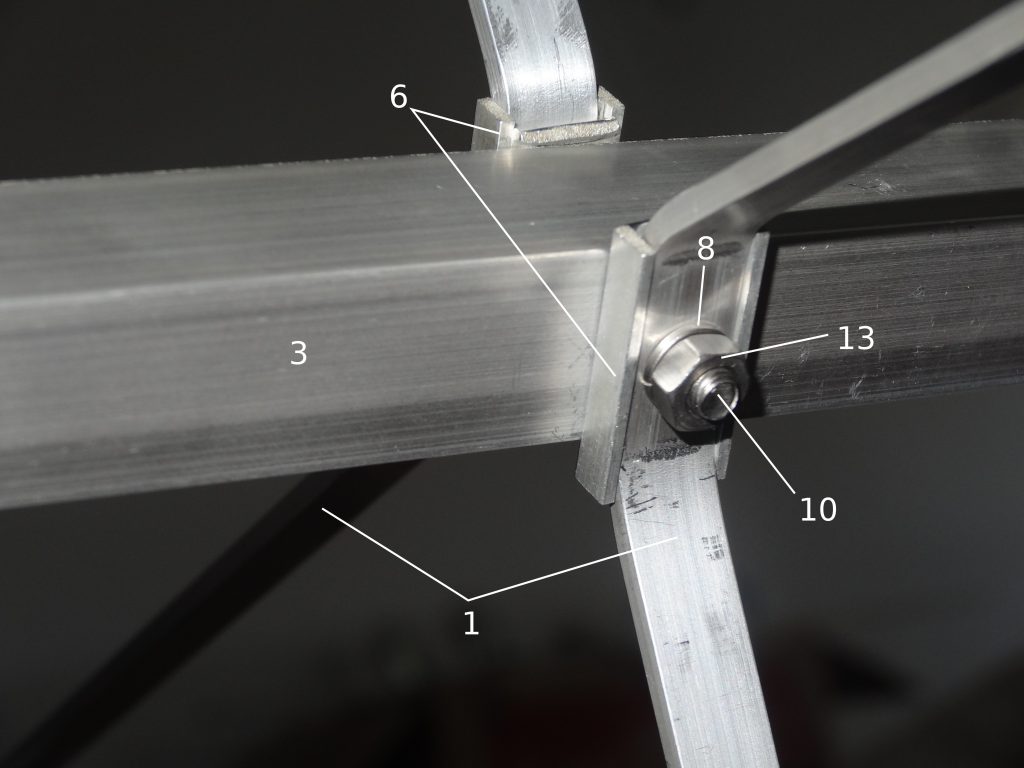
Now the quad-element radiator (2) can be joined with the antenna boom (5) by inserting the fix-mounted radiator screws into two pre-drilled holes in the antenna boom (4). Next small lock washers (8) are placed on the screws followed by M5 locking nuts (13). Note: I’ve used separately bought locking nuts here, as only standard M5 nuts come with the assembly kit. The loose element of the quad-element radiator (2) is connected with the antenna boom (5) by one of the self-tapping screws (15). Because the pre-drilled hole for (15) was a bit small I had to increase it’s diameter with a 3.2 mm drill bit.
Finally it’s time to mount both the director and reflector elements (1). The reflector elements (1) are the longest elements and are mounted directly behind the x-quad antenna radiator (2). The mounting sequence is: A M5x35 screw (10) is inserted into the first reflector element (1) followed by a anti-twist device (6), through the antenna boom (3) followed by another anti-twist device (6), a lock washer (8) and a nut (13).
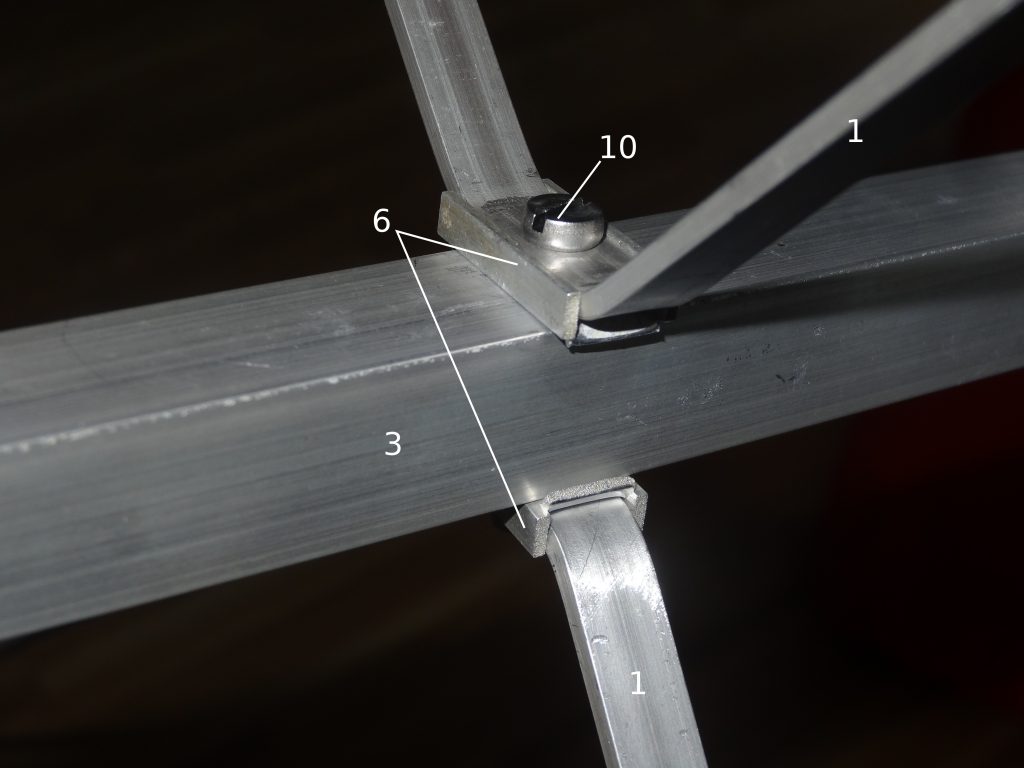
The first director (1) is a bit smaller than the reflector and is mounted directly in front of the quad-element radiator (2). All other director elements are of equal size (and a bit smaller) than the first director.
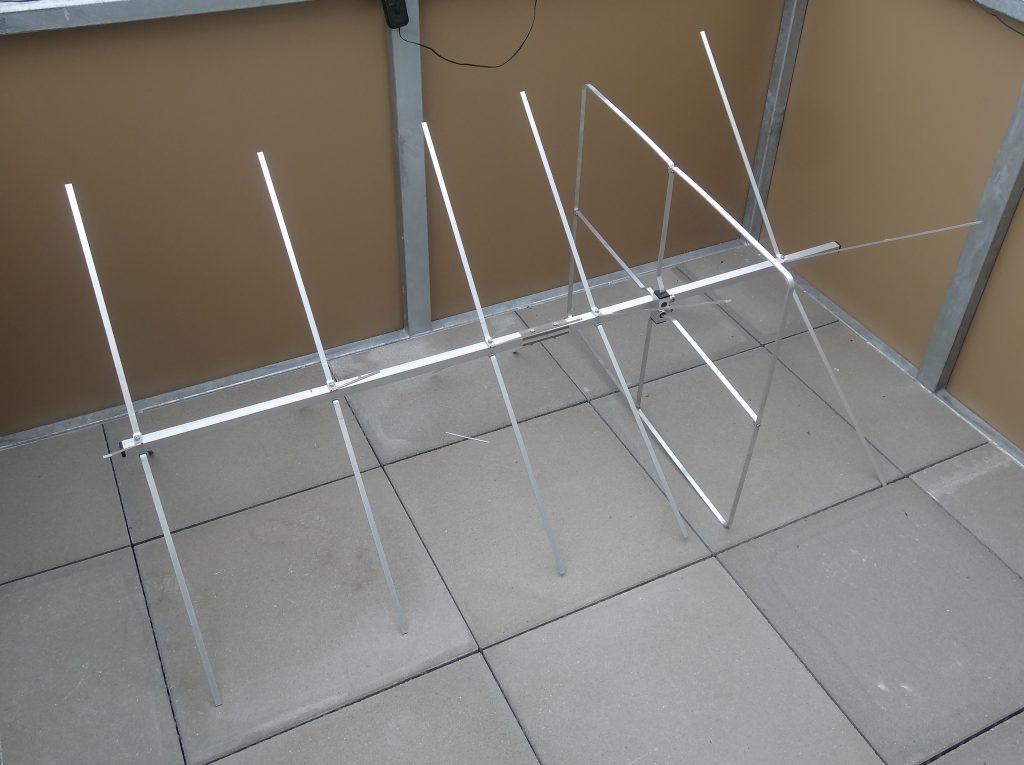
Congratulations, we’ve got ourselves now a fully assembled WiMo X-Quad Antenna for 2m with the circumference (although not the volume) of a large Christmas tree. However, my XYL wasn’t exactly amused about the new addition to our balcony 🙂 .
Assembly of the WiMo X-Quad Antenna Mount
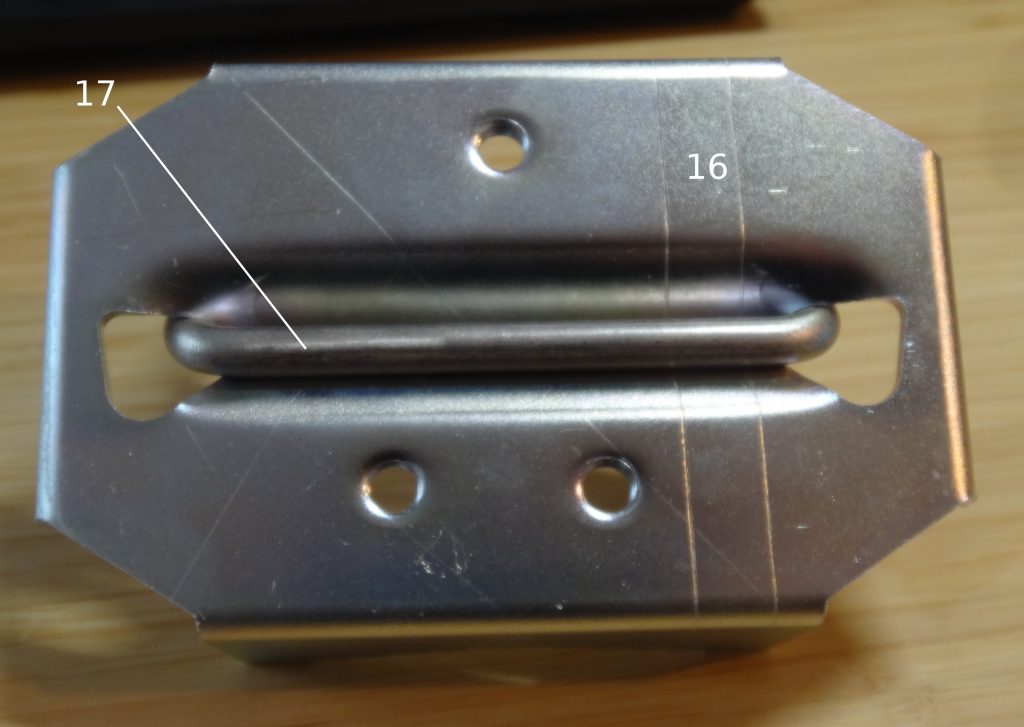
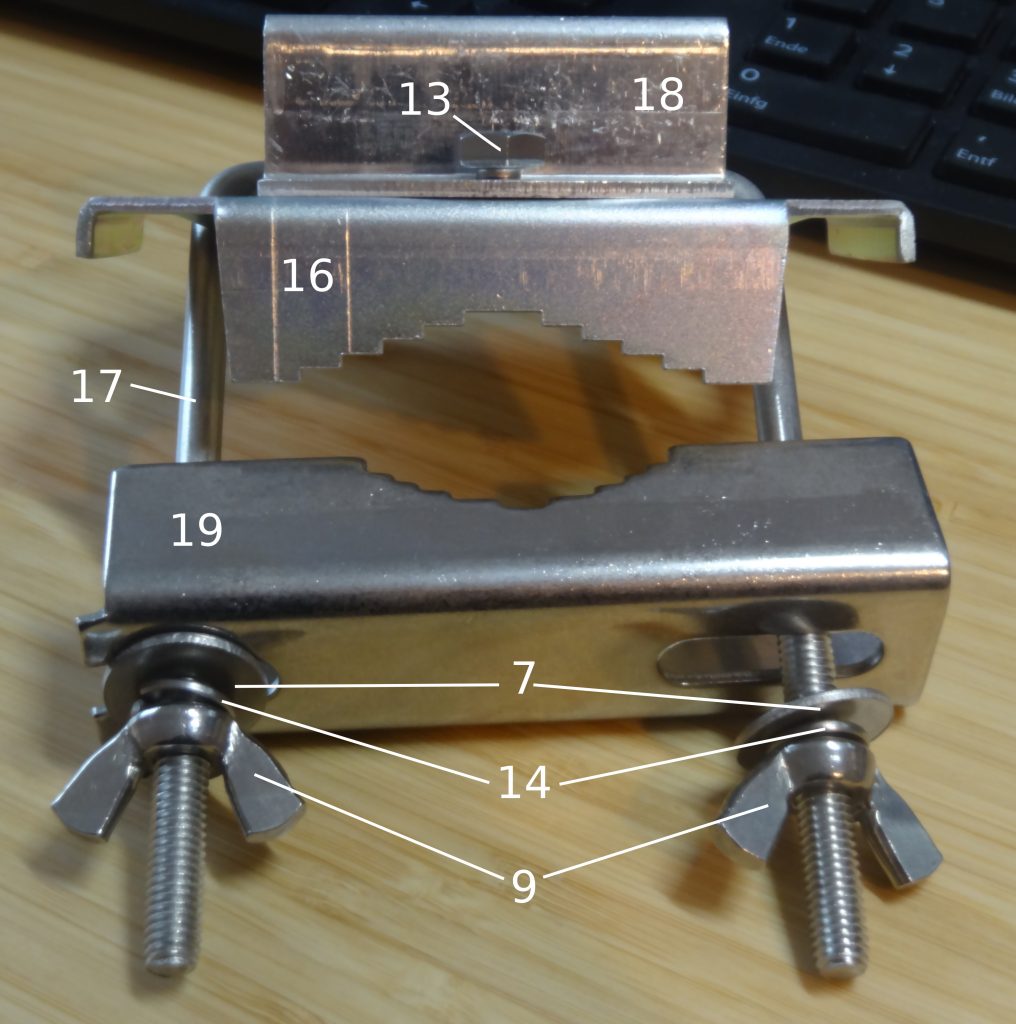
Now that the antenna itself has been completely mounted it’s time to assemble the antenna mount. As a first step a U-bolt (17) is inserted into the fixed-clamp (16).
Next the boom-clamp (18) is mounted to the fixed-clamp (16) using two M6x12 screws (12) and nuts (13).
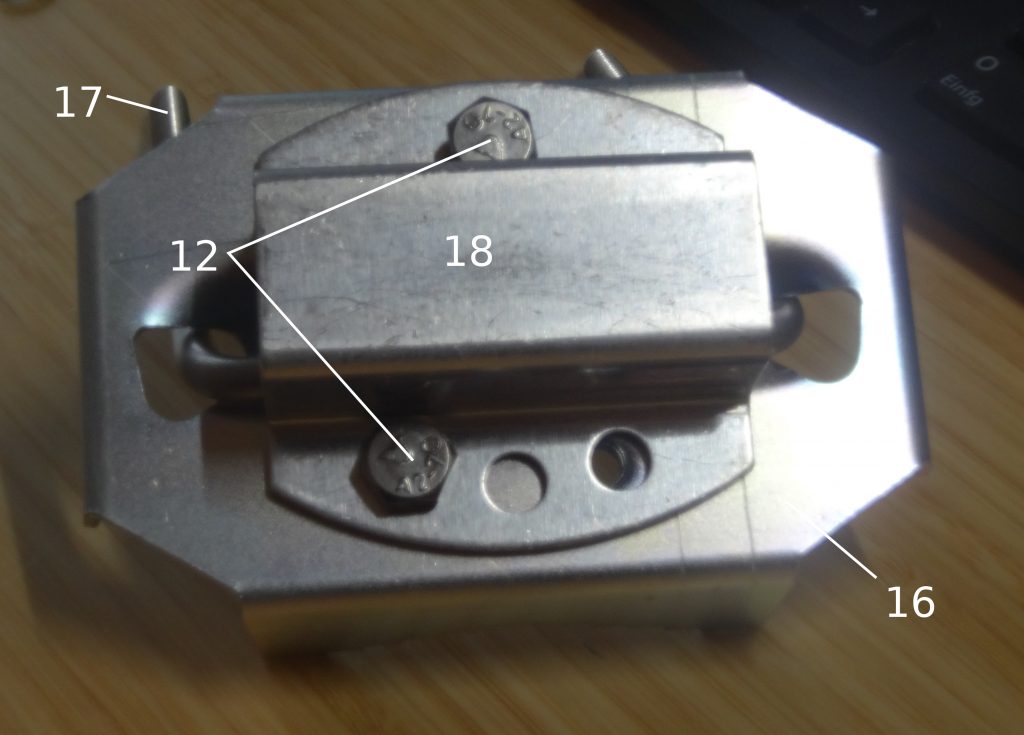
Finally the mast-clamp (19) is mounted onto the U-bolt (17). A M6 washer (7) followed by a M6 lock-washer (14) and a wing nut (9) are threaded onto the U-bolt (17). The WiMo X-Quad antenna mount is now complete!
As a last step the the antenna mount should be mounted onto the rear end of the antenna boom (behind the reflector). However, I’m refraining from doing so for now.
Testing the antenna
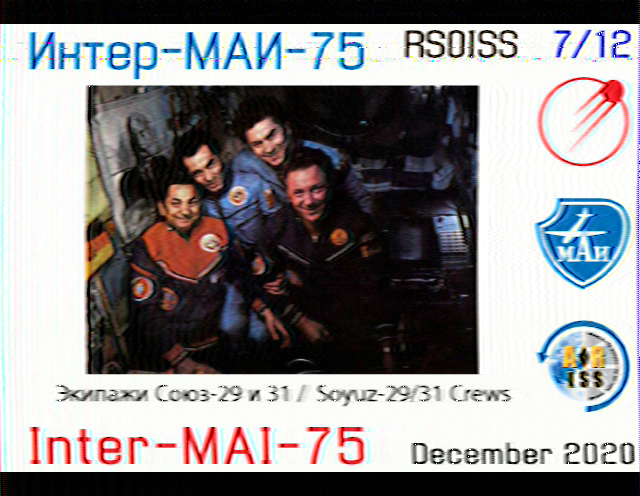
First test data of using the antenna was collected during the MAI-75 ARISS SSTV Event. During one pass of the ISS I was capable of capturing the image shown below while manually guiding the antenna from my balcony. It goes without saying that I could not have achieved such a result with the rubber duck antenna of my handheld 2m portable radio.
9 comments
Bob Machette AI5CA 08/08/2022
This was extremely helpful, thank you. Is there a method to mount center mast?
Alexander Entinger (OE5LXR) 08/08/2022
Hi Bob, AI5CA! Thank you for your kind comment, I'm glad this article was helpful to you. As for center mounting, I assume you mean to mount the antenna boon at the center instead of at the end? That should be perfectly fine, i.e. see here. Kind regards, vy 73 de Alex, OE5LXR
Stan 17/11/2022
Will the mount accept a 2" boom diameter? Thanks
Alexander Entinger (OE5LXR) 28/11/2022
Dear OM Stan W5PDQ ;) I've got to take a look and see myself how far the antenna clamp opens. Sorry for the delay, busy, busy, busy during the closing months of the years. vy 73 de Alex, OE5LXR
Nitin 08/01/2023
Hi Alexander. Happy New Year. This was extremely helpful to complete the assembly of 2 X 2 Meter and 2 X 70 cms antenna. I plan to stack them on a H Frame. I want to mount the mast at the center. will there be any issue as the H frame is made of aluminium tubing. 73 DE Nitin, VU3TYG
Alexander Entinger (OE5LXR) 08/01/2023
Dear Nitin! Happy New Year to you too and thank you for reaching out! I took a look at your QRZ page linked in your comment and I really love your station. I don't really have one, living in an antenna restricted area so it's mostly portable operations (SOTA) for me. That being said I always took matters into my own hand(s) when using my X-Quad. So unfortunately I can't really advise you if center mounting those antennas would negatively impact their performance. Best to try it out ;) and please let me know what you find! All the best, looking forward to hear from you, vy 73 de Alex, OE5LXR
Nitin 09/01/2023
Hi Alex, Thanks for the prompt reply and your thoughts. I will surely share the feedback. 73 Nitin [VU3TYG]
Stefan 25/04/2024
Hi Alexander, Ist das gespeiste Element bei deiner Antenne ein "echtes" Rechteck mit gleicher Länge /Breite oder ist eine Ebene ggf. länger als der Andere? 73 de Stefan
Alexander Entinger (OE5LXR) 25/04/2024
Hi Stefan, So weit ich mich entsinne sind die Seiten bei dem gespeisten Elemement nicht gleich lang. Für die genauen Abmessungen müsste ich allerdings zur Antenne, und das könnte eine Woche dauern ;) Liebe Grüße, vy 73 de Alex, OE5LXR